Installing a plugin in WordPress is a straightforward process that can significantly enhance the functionality of your website. Whether you want to improve SEO, add contact forms, or integrate social media, WordPress plugins are essential tools for any site owner. In this article, we will guide you through the steps to install a WordPress plugin, ensuring you can make the most of your WordPress experience.
Table of Contents
What is a WordPress Plugin?
A WordPress plugin is a piece of software that adds specific features or functionalities to your WordPress site. With thousands of plugins available, you can customize your website to meet your unique needs. From security enhancements to performance optimizations, the right plugins can transform your site into a powerful online presence.
Why Use WordPress Plugins?
Using WordPress plugins offers numerous benefits:
- Enhanced Functionality: Plugins allow you to add features without needing to code.
- Time-Saving: Many plugins automate tasks, saving you time and effort.
- Customization: You can tailor your site to fit your brand and audience.
- Community Support: Most popular plugins have extensive documentation and community support.
How to Install a WordPress Plugin
Now that you understand the importance of plugins, let’s dive into the steps to install a WordPress plugin.
Method 1: Install a Plugin via the WordPress Dashboard
Step 1: Access Your WordPress Dashboard
To begin, log in to your WordPress admin dashboard. This is typically found at yourwebsite.com/wp-admin. Once logged in, you will see the main dashboard where you can manage your site.
Step 2: Navigate to the Plugins Section
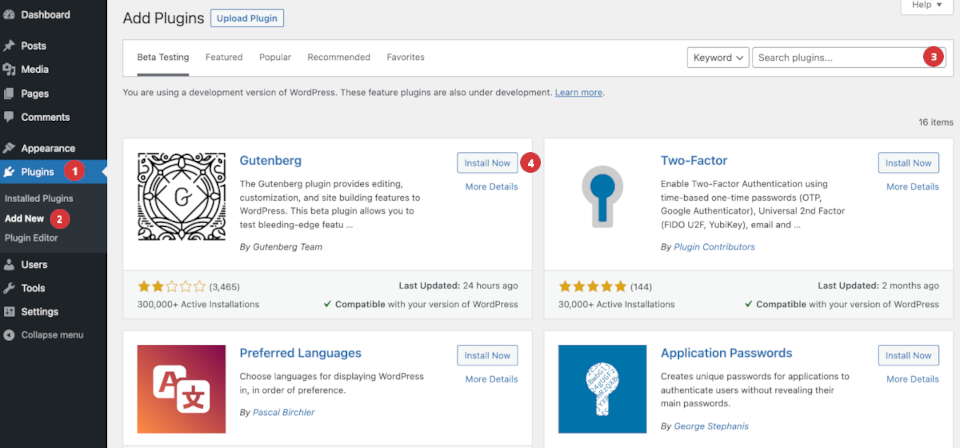
On the left-hand menu, locate the “Plugins” option. Hover over it, and you will see a submenu. Click on “Add New” to access the plugin installation page.
Step 3: Search for a Plugin
In the “Add Plugins” section, you can search for a specific plugin using the search bar. If you know the name of the plugin you want to install, type it in. Alternatively, you can browse featured, popular, or recommended plugins.
Step 4: Install the Plugin
Once you find the desired plugin, click the “Install Now” button. WordPress will automatically download and install the plugin for you. This process usually takes just a few seconds.
Step 5: Activate the Plugin
After installation, the “Install Now” button will change to “Activate.” Click on it to enable the plugin on your site. Some plugins may require additional configuration after activation, so be sure to check the plugin settings.
Step 6: Configure Plugin Settings
Most plugins come with their own settings page. To access it, go to the “Plugins” section and find the newly installed plugin. Click on “Settings” or the plugin name to configure its options according to your needs.
Method 2: Offline File Upload Installation
If you have a plugin that you downloaded as a .zip file, you can install it offline. Here’s how to do it:
Step 1: Download the Plugin
First, download the plugin .zip file from a trusted source. Ensure that the plugin is compatible with your version of WordPress.
Step 2: Access Your WordPress Dashboard
Log in to your WordPress admin dashboard as you would normally.
Step 3: Navigate to the Plugins Section
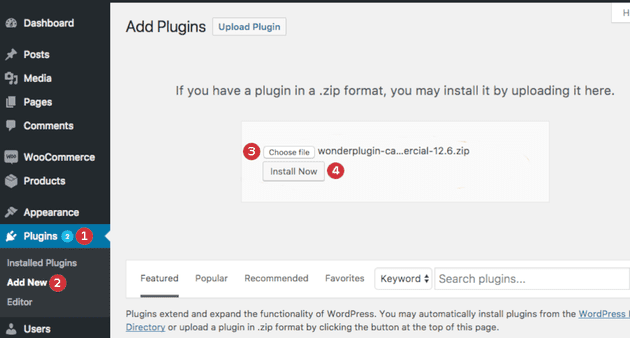
On the left-hand menu, click on “Plugins,” then select “Add New.”
Step 4: Upload the Plugin
At the top of the “Add Plugins” page, you will see an “Upload Plugin” button. Click on it, and then click “Choose File” to select the .zip file you downloaded.
Step 5: Install the Plugin
After selecting the file, click the “Install Now” button. WordPress will upload and install the plugin from the .zip file.
Step 6: Activate the Plugin
Once the installation is complete, click the “Activate Plugin” link to enable it on your site. As with the online installation, you may need to configure the plugin settings afterward.
Common Issues When Installing WordPress Plugins
While installing a WordPress plugin is generally a smooth process, you may encounter some common issues:
- Compatibility Issues: Ensure the plugin is compatible with your version of WordPress.
- Memory Limit: Some plugins may require more memory than your hosting plan allows. Consider upgrading your hosting if you encounter this issue.
- Plugin Conflicts: Occasionally, plugins may conflict with each other. If you experience issues, try deactivating other plugins to identify the culprit.
Best Practices for Using WordPress Plugins
To ensure a smooth experience with your WordPress plugins, follow these best practices:
- Limit the Number of Plugins: Too many plugins can slow down your site. Only install what you need.
- Keep Plugins Updated: Regular